Tutorial on how to use Audio Comparer™
In today's digital age, our devices are flooded with audio files, ranging from music tracks to podcasts, voice memos, and more. Over time, it's easy for duplicates to accumulate, taking up valuable drive space. Not only does this clutter your storage, but it can also make it harder to find the files you really want. In this tutorial, we'll guide you through the process of identifying and deleting duplicate audio files, helping you reclaim precious storage space and organize your audio library more efficiently.
The Audio Comparer's primary goal is to find duplicate audio files and sort them in any way suitable for you. The program is capable of properly organizing even the most extensive music collection. As the name suggests, the program's mechanism is based on the comparison process of audio files, which means Audio Comparer can easily find both exact duplicates, and similar files, "similarity threshold" being specified. The major difference between the program and other audio duplicate finders is in the comparison mechanism: Audio Comparer carefully "listens" to your audio files and compares them by their actual audio content, just like human ears do. The search is performed precisely by sounding - the actual content of the file, not its external properties like tags or size. That is why the program finds not only duplicates but similar files as well. Unlike other utility programs of that kind, Audio Comparer works equally well with files of different formats, one by one comparing MP3, MP2, MP1, WMA, AIF, WAV, OGG, Opus, FLAC, ALAC, APE, WavPack, Musepack, TTA, AAC files.
Working with the Program
Now let's consider in detail the process of installing and working with it. Start the program. By default, every time the application is started, the Comparison Wizard appears. It will tell you about the program, and in a matter of seconds, help you find audio duplicates and similar audio files.
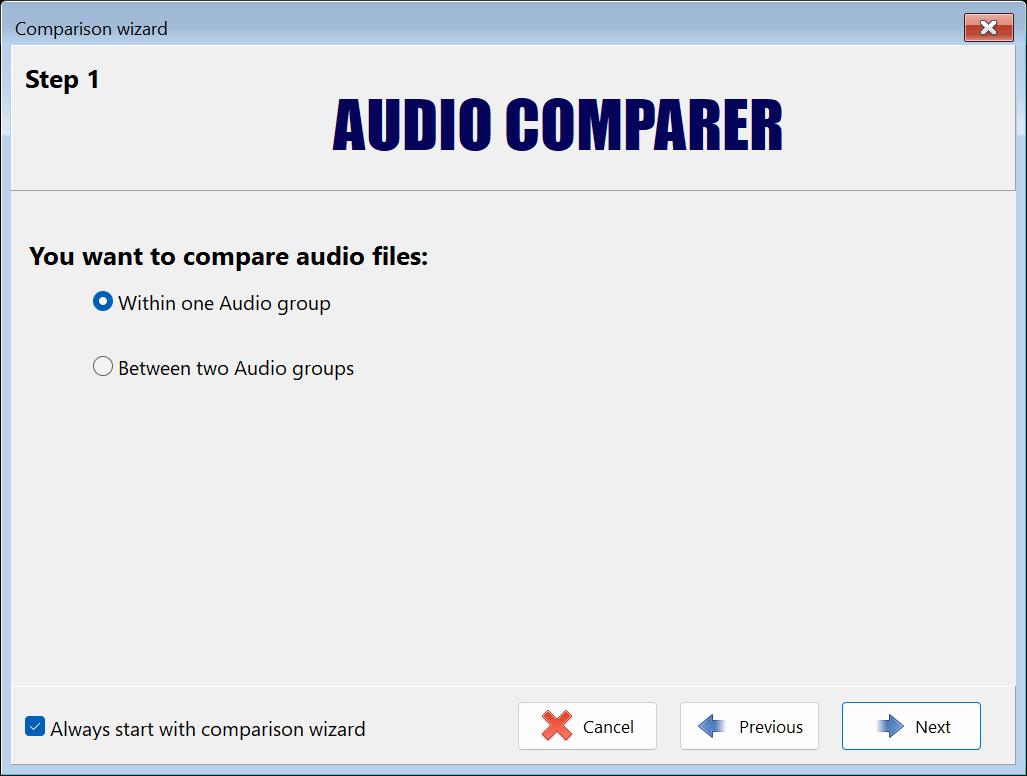
Later on, when you get the feel of the program, the tick "Always start with Comparison Wizard" can be removed, and Comparison Wizard will no longer distract your attention.
Then press "Next". The program enables you to compare "Within one audio group" or "Between two audio groups". Each "group" is a set of audio files that can be located in different places. When you deal with the search within one group, the program will search for similar audio files among all the records in the audio group. If the search is performed between two groups, the program compares every audio file with every audio file in the second group.
After choosing the comparison option, click 'Next'. Suppose you need to find duplicates within one group. At first, the program offers you to set the name of the Audio group to be formed and add folders with audio files to it.
It is especially convenient that a group may include all audio files, even if they are located on different logical drives.
After musical files are added to the group, you need to specify which files you're trying to find: "Exact duplicates" or "Similar audio files". Depending on the results needed, select one of the options and press "Next".
At the next stage, you have to specify the location path where you want to save the results and press "Process".
Apart from the Comparison Wizard, in the program, there's an opportunity provided to form an Audio group independently. To achieve that, select the item "New" in the menu Audio group. Then specify the folder with audio files you wish to add to the group and enter the name of the Audio group.
After that, the program starts "listening" to audio files, and the following window is displayed:
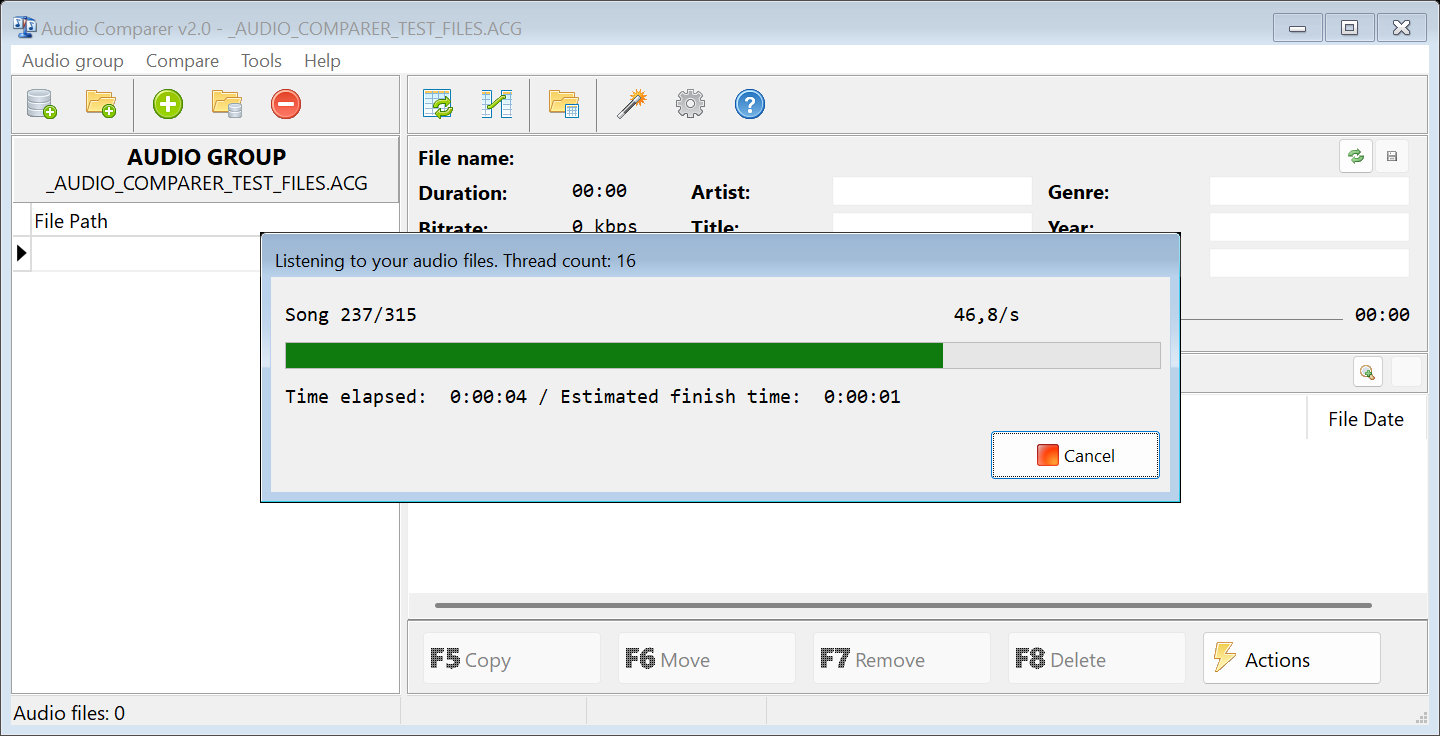
Audio Comparer will listen to the music collection and catalog the sound characteristics of each musical composition within an "Audio group". "Listening" does not take much time: the program is capable of analyzing audio files at 10–12 files per second on modern multi-core CPUs -- a HUGE time saver in helping you maintain your audio file collection!
After the listening process has been finished and the audio group formed, the comparing process begins. Comparing can be performed within one group or between the groups. Comparing requires much less time than listening, which is why the result of the comparison appears on the screen within several seconds. The Audio Comparer displays the results in the form of a tree chart. Each nested branch includes similar files found with the same similarity degree as the parent branch file. The program provides the opportunity to mark the files, and after that, you may move, copy or delete them. It is very convenient that each action may be performed using a specific functional key [F5], [F6], [F7], [F8]:
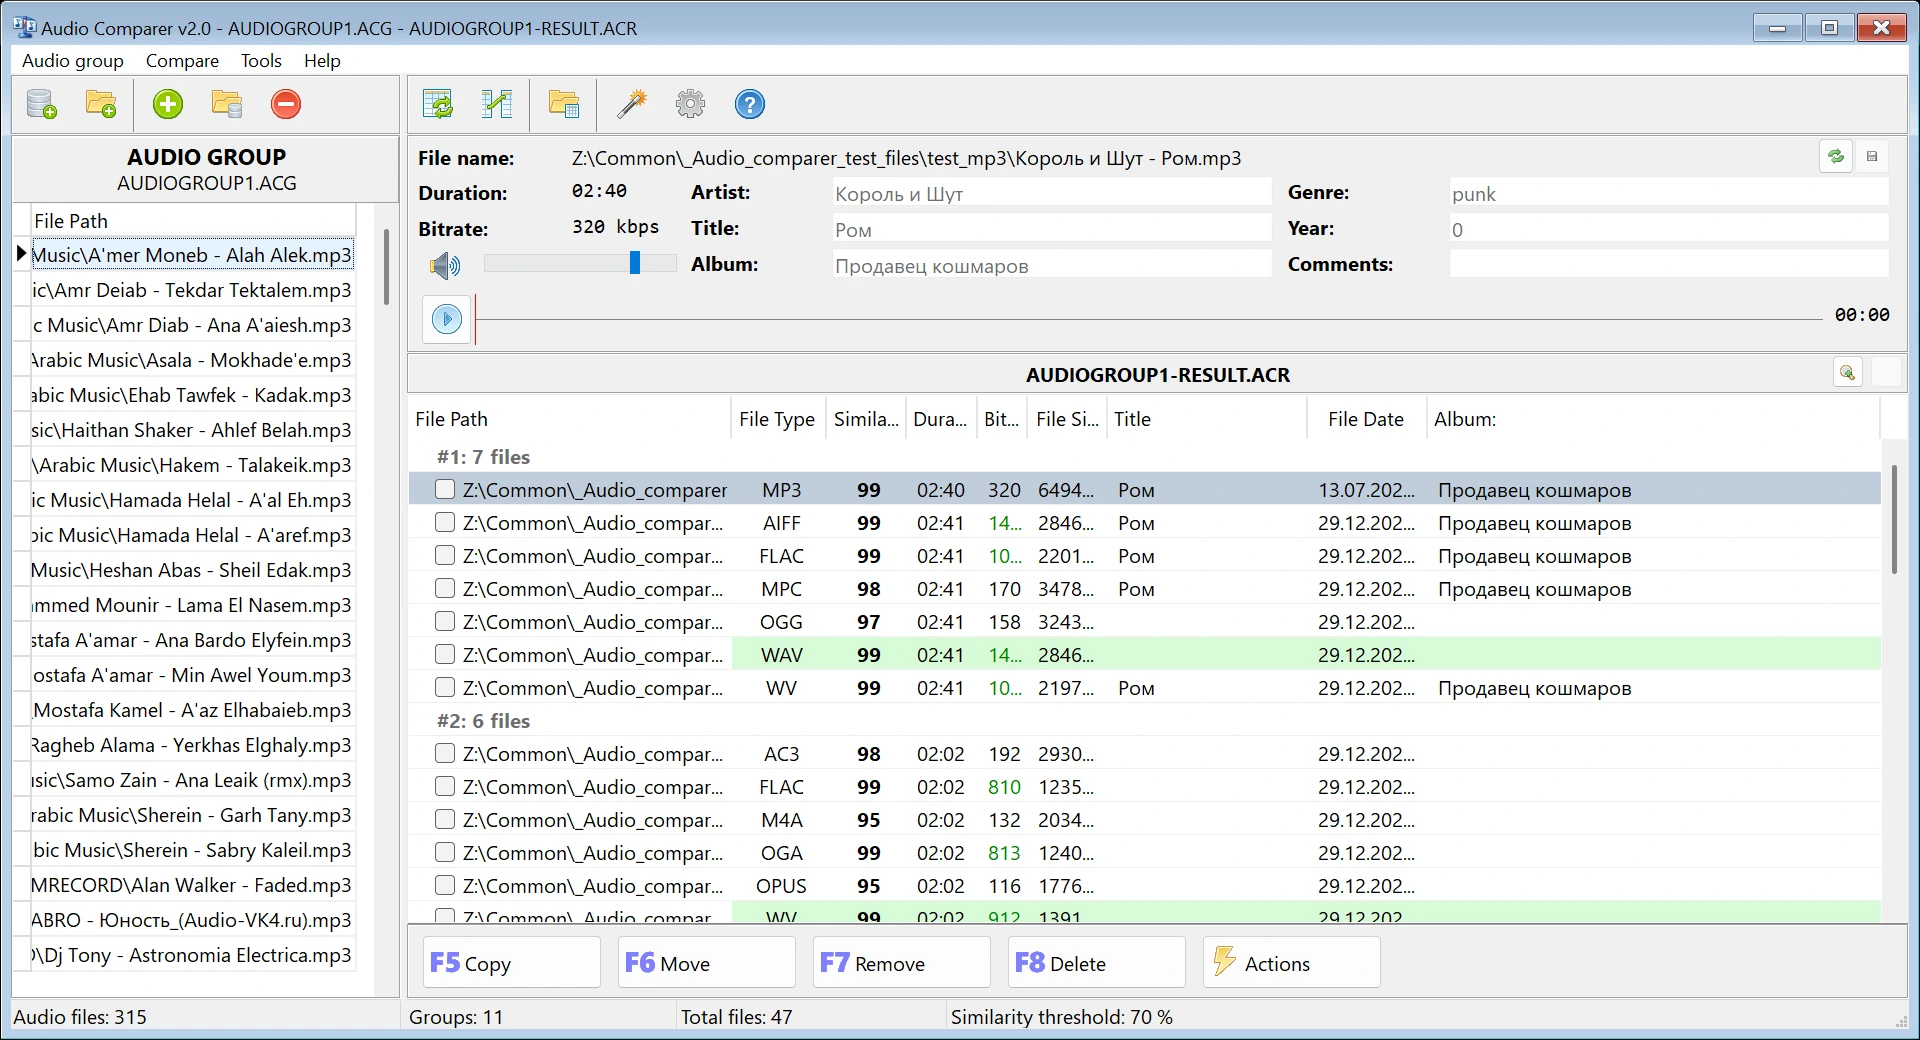
The program has a simple embedded player (there are volume control and Play/Pause buttons), and, apart from the title and location, for each audio file there is specified such data as duration, bit rate, artist, album, genre, year and even comments to the file. So, the information about each file is displayed clearly and conveniently; besides, at any moment you may listen to any composition if its title conveys nothing to you (it's rather convenient for extensive collections).
Comparing a pair visually
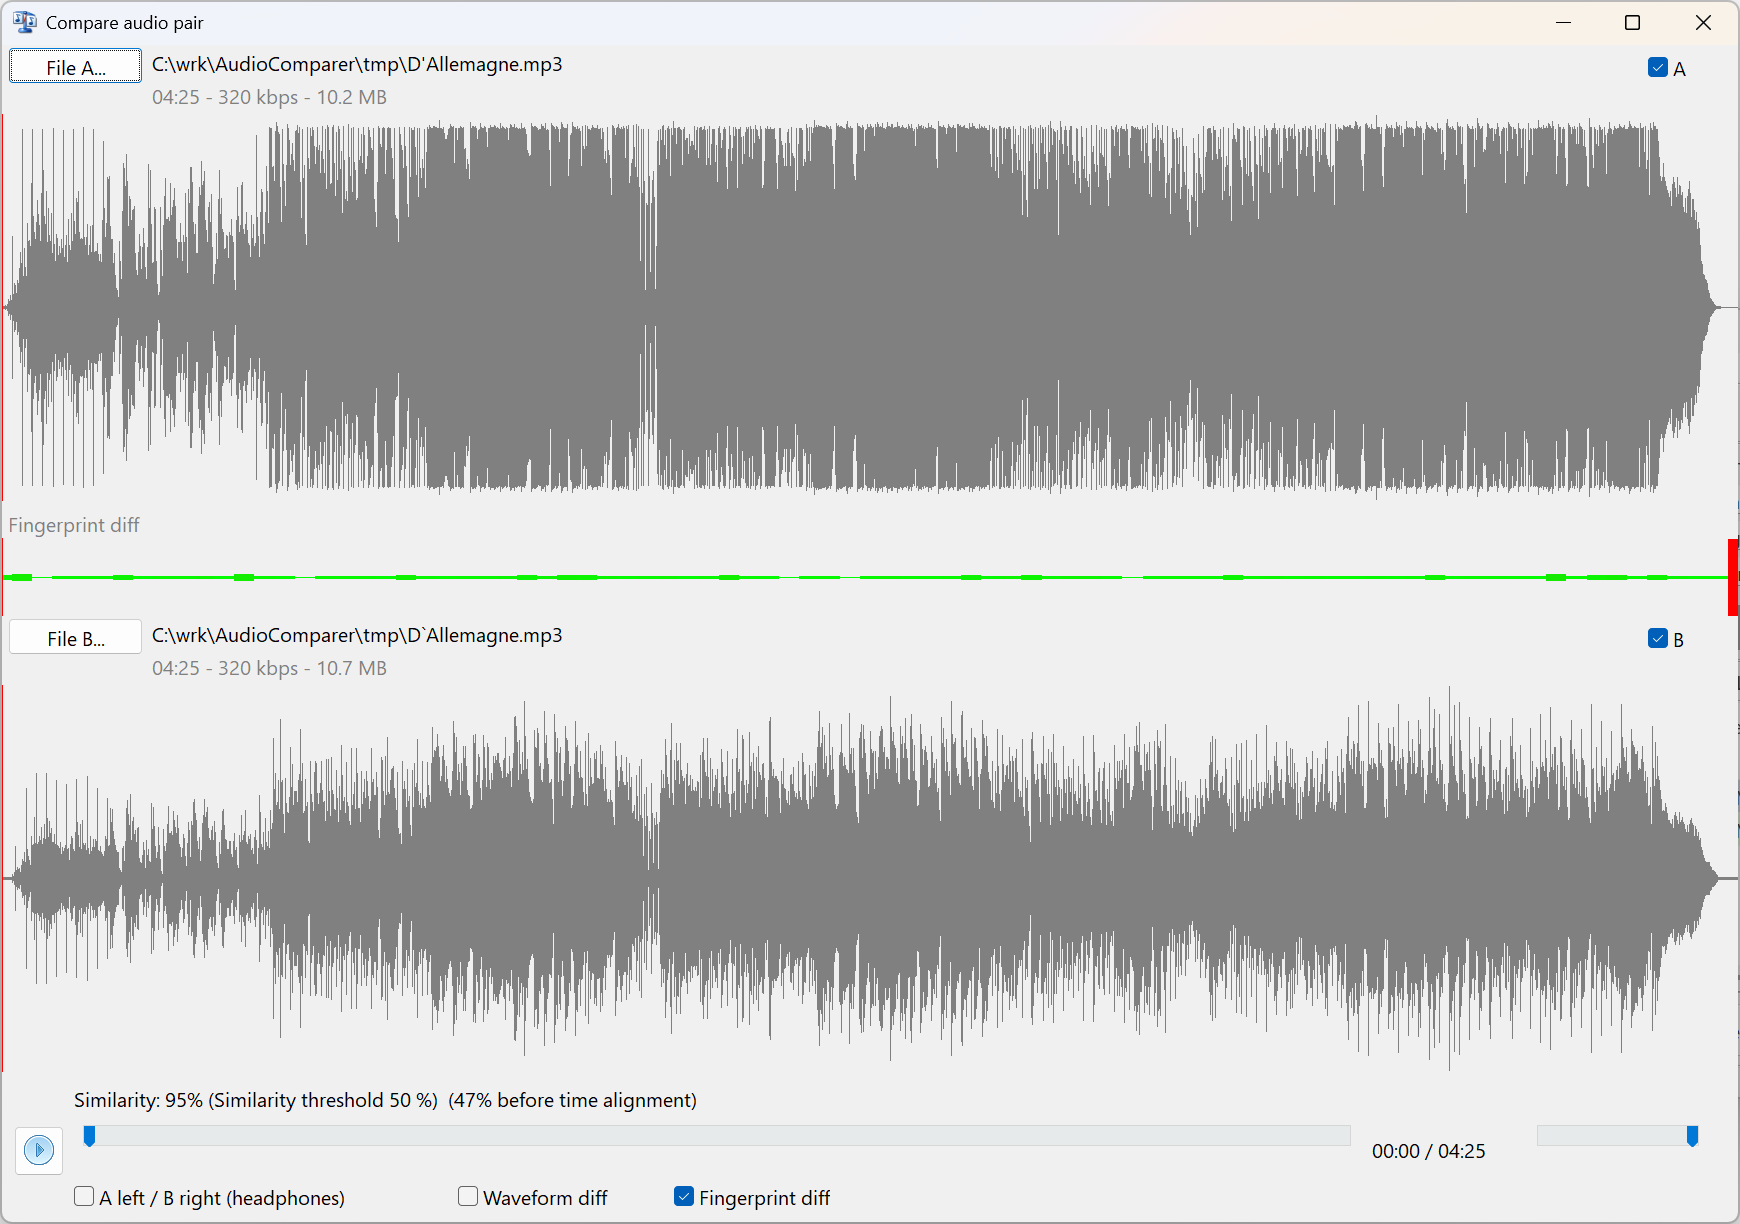
When two files in a group look equally good on paper, put them side by side: select a file in the results and choose "Compare pair visually…" in the Tools menu, or use the right-click menu. The window shows both waveforms one above the other, a strip marking second by second where the recordings diverge, and the similarity score. Both files play in sync, and a headphone mode sends file A to the left ear and file B to the right. Press Esc to close the window.
Marking and deleting files
Now that we've got the results displayed in the form of a tree, the only thing left is to click on unnecessary files and take different actions with them. Well, if you need to delete audio files marked in the results, press F8 or the "delete" button. There appears to be a confirmation window.
It provides a list of files to be deleted. Again, you've got a chance to play the melody once more if you're not sure of this or that file. There is also information about the total number of files to be deleted and how much disk space will be released. You may take some files out of the list and confirm the list of files to be eliminated.
Coming back to the tree chart. You can see the "Actions" button, which implies the following options:
- It is another song! — takes the selected file out of its group in the results;
- Set marks automatically… — marks files using the criteria you configured;
- Remove all marks — clears every mark with one click;
- Open folder — opens the folder of the selected file in Explorer;
- Compare pair visually… — opens the pair comparison window described above;
- Add folder of this file to favorites — adds the folder to the favorites used by automatic marking;
- Save comparison log — writes the log of the last comparison to a file;
- Groups as CSV… / Pairs as CSV… — export the results for a spreadsheet.
When you select the option "Set marks automatically", the "Automarking" window is displayed, and the program offers to choose between the following options:
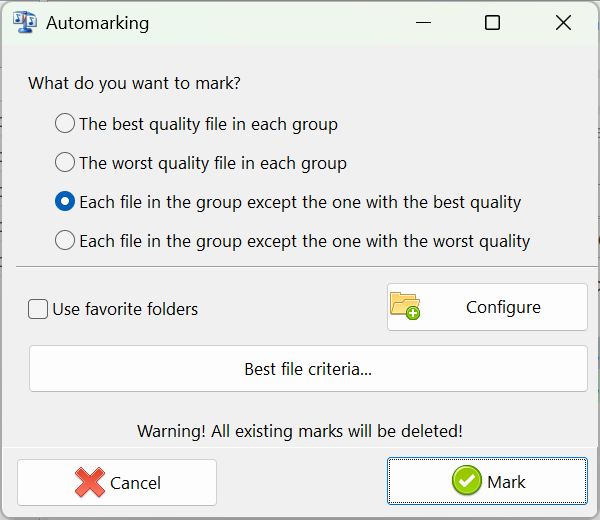
Considering the criteria set, the program invites you to automatically mark either the file with the best or worst quality in the group or each file in the group, except one of the best or worst quality. At that point, the user's marks are automatically deleted.
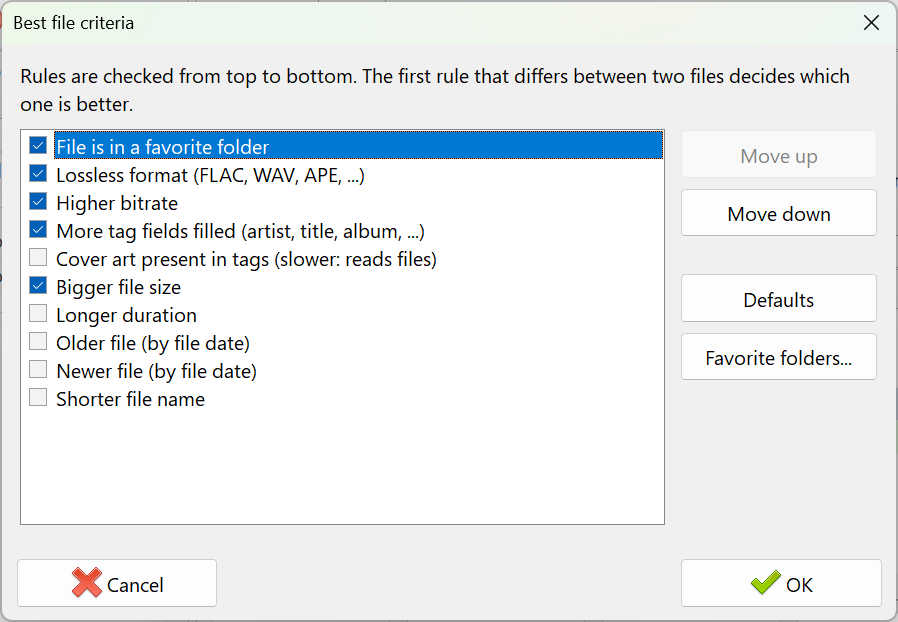
What counts as "the best quality" is up to you. The "Best file criteria…" button — available here and in Preferences — opens a list of ten rules: favorite folder, lossless format, bitrate, tag completeness, cover art, file size, duration, file date and file name length. The rules are checked from top to bottom, and the first one that differs between two files decides the winner. Reorder them, switch off the ones you do not care about, and the same order drives both the automatic marking and the file highlighted as recommended in the results tree.
Menus and preferences
Now let's take a brief look at the menu and its peculiarities.
Having formed an audio group once, using the menu, you will be able to add new files and folders to it and delete unnecessary or excessive audio files. To achieve this, there are shortcut buttons on the panel: "Add files" (a white-colored "plus" on the background of the green circle), "Add folder" (a "folder" sign with a green "plus"), "Remove files" (a white "minus" on the background of the red circle), as well as buttons for quick creation of an audio group and opening of the existing audio group.
So, you've enlarged your collection, and now you'd like to include new audio files in the audio group. Select "Add", choose the folder with new audio files, and the program starts listening to the files. Once the listening process has been completed and new files have been added to the audio group, we proceed to the comparison process. In the "Compare" menu, choose either "Within the group" or "With another group" and start comparing. In the right part of the screen, you'll see the results: similar files in the form of a tree, but considering newly added audio files, as well as similarity degree in percentage. Now you are welcome to perform different actions with these files. The same menu holds "Check new files with the current group…": it compares a handful of newly downloaded files against an existing group without rebuilding it.
Using the "Audio group" menu, you can also compact your collection and sort it by file name, file date or file size.
On the quick-start panel, you can also find 'quick' buttons for comparing within the opened group and comparing with another group, the button for opening the saved results, the "magic wand" sign to run the Comparison Wizard, the gear sign to activate 'preferences' dialog box, and the standard help button.
In the Compare menu, apart from the options already described, you may also take different actions with comparison results: refresh, save to the specified location, and open the saved results.
Let's come over to "Preferences" in the Tools menu. In the "General" tab, you may set the order of using the comparison wizard, enable or disable multicore CPU optimization, and set a very convenient option of highlighting missing files. Well, if you have already taken any actions with an audio group and deleted or moved some files to another folder, they will be marked red. If you choose the "Refresh" option in the menu Audio group, then all missing files marked red will be removed from the group. So, all the actions taken by the audio group will be seen.
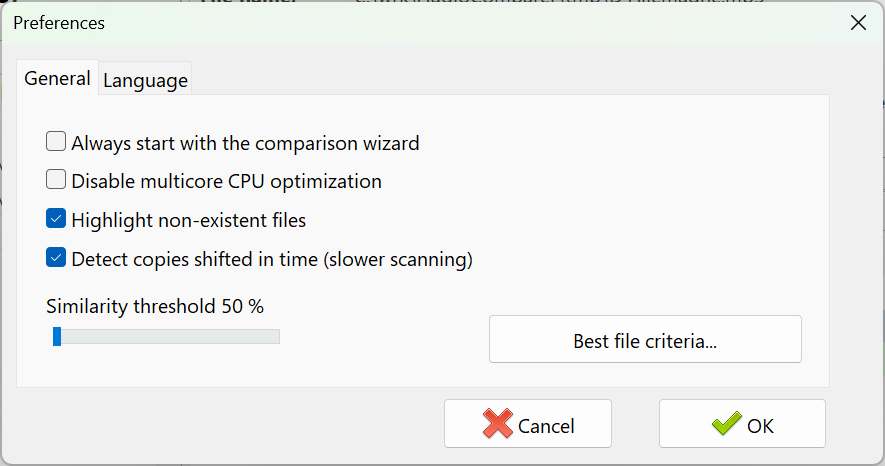
This tab also holds two options added in version 2.1: "Detect copies shifted in time (slower scanning)", described below, and the "Best file criteria…" button, which opens the same rule list the automatic marking uses.
Here you can also set the necessary "similarity threshold". So, if you need to find exact duplicates in your collection, move the slider to the extreme right position and, by doing so, set the "similarity threshold" at the level of 100%. If you want to find similar files, then you need to move the slider and set the similarity degree required. By default, the similarity threshold is set at 70%. This is the criteria the program will be guided by in searching for similar audio files.
Copies shifted in time
Two copies of the same recording rarely start at exactly the same instant. Re-encoding to MP3 adds encoder delay, and a track ripped from a CD, bought in a store or captured from a stream can easily be shifted by a fraction of a second against its twin. Compared from position zero, such a pair scores like two unrelated songs and stays in your library unnoticed — even though it is exactly the duplicate you were looking for.
The option "Detect copies shifted in time (slower scanning)" in Preferences makes the program look for the best alignment between two tracks before scoring them. It is switched on by default and costs a little extra time while the group is being listened to.
Audio groups built before the option was switched on do not carry the data it needs. The program notices this and warns you before the comparison starts, offering to update the group: only the missing fingerprints are recalculated, and the comparison restarts by itself once that is done. The status bar shows how many files of the current group still lack the data.
In the "Language" tab, you can choose from twelve interface languages: English, German, Spanish, French, Italian, Dutch, Portuguese, Turkish, Russian, Chinese, Japanese and Korean.
Conclusion
As your extensive music collection continues to grow, Audio Comparer will serve as an increasingly valuable tool. The program is easy to use and has a nice, user-friendly interface. At the same time, it processes the enormous amount of musical files, spending minimum time on this and releasing much spare room on your hard drive. The program's 'intellect' allows it to listen to a composition just once and remember it forever, which is very convenient for large musical collections. The utility will be especially useful for those whose musical collection includes hundreds and even thousands of compositions, as well as MP3, WMA or OGG files with tags unfilled.
Audio Comparer will help to find duplicates and, based on their quality, recommend which files to save and which to delete. The program runs on any PC with an OS from Windows 7 to 11. RAM capacity is not crucial, but the program "prefers" fast processors.